Hey all,
This post is about using Responder and Snarf to poison broadcasts, SMB relay, enumerate privileges and files, and when we choose, spawn a shell. Bonus post includes doing all of the above through a pivot.
Tools:
- Responder – https://github.com/SpiderLabs/Responder
- Snarf – https://github.com/purpleteam/snarf
- Impacket tools – https://github.com/CoreSecurity/impacket
Mitigations:
- Disable LLMNR and/or NBSNS – http://www.pciqsatalk.com/2016/03/disable-lmnr-netbios.html
- SMB signing – https://technet.microsoft.com/en-us/library/jj852239(v=ws.11).aspx
I would imagine the majority of the offsec crew can appreciate Responder and all that it can do. Using in UNION with SMB relay, it can be a great way to get that first shell or enumerating sensitive files. The good old days where we can relay back to the source are long past us (well I hope), but that doesn’t mean we should dismiss this as a potential wedge point.
Some SMB relay tools that come to mind are as follows: Metasploit’s Smbrelay module, Impacket’s Smbrelayx, and Multirelay. I don’t think much needs to be said about Metasploit or Impacket’s relay solutions, both are pretty popular and solid at what they do. In another post, I’m going to spend a few cycles talking about Multirelay. Multirelay is included in the Responder toolset and is also written by the guru himself, Laurent Gaffie (http://g-laurent.blogspot.ca/).
My Lab Setup:
- 192.168.1.50 (int-dc) – Windows 2012 Domain Controller
- 192.168.1.51 (int-dm) – Windows 2012 Domain Member
- 192.168.1.52 (int-win10) – Windows 10 Domain Member
- 192.168.1.53 (int-win7) – Windows 7 Domain Member – Frank’s PC
- 192.168.1.10 (thundergun) – First Responder
Frank is our target user using 192.168.1.53, he is a domain user with local administrator access on 192.168.1.51 and 192.168.1.53. Additionally, he has access to a fileshare on 192.168.1.52 but does not have local administrator privileges. Frank has a mis-configured share, cannot type correctly when trying to browse to a fileshare, or maybe wpad isn’t disabled (I’m going to deep dive this with Snarf in another post), either way Frank is sending out juicy broadcasts waiting for reply.
We know relaying is an option but we know neither where or how yet. Shells are great but in this scenario they come at a price. In order to establish a shell using SMB relay we need to execute our code, which usually means writing to disk and creating a service, very noisy. Clearly I’m not saying this is a no-go, but honestly, I would prefer to take it a bit slower and get the lay of the land before writing to disk and modifying the target system.
First we’ll make a few assumptions, our SMB source is a no-relay as it’s Windows 7 (MS08-068). Any targets configured to enforce SMB signing will also fail, this probably includes the domain controller which is configured to do so by default as per the default domain controllers group policy. Running RunFinger.py -i *target range* in the responder tools directory will identify targets that enforce SMB signing, a great way to eliminate SMB relay.
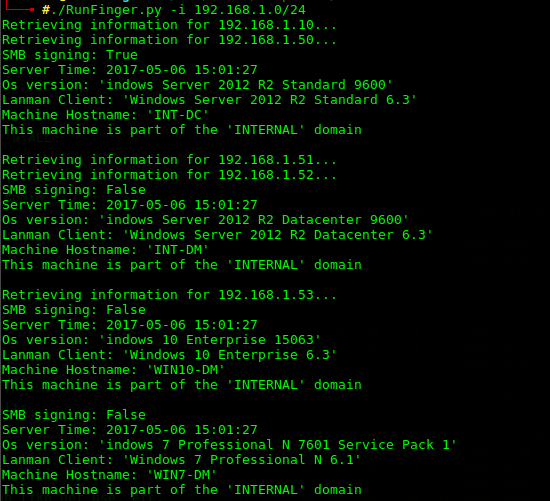
The RunFinger.py output is a bit skewed but is as expected, the domain controller has signing enabled while the domain members do not. Our possible targets are 192.168.1.51, 192.168.1.52, and 192.168.1.53. Again, we are looking for local administrator access or sensitive files, anything to get that initial foothold.
By default, upon execution Responder will load several rogue authentication servers including a SMB server. Since the plan is to use Snarf as our relay tool, we will disable the default SMB server. To do this, set SMB = Off in the /etc/responder/Responder.conf configuration file. Additionally, if the preference is to narrow the broadcast response scope, configure the RespondTo setting to the target range, mine is RespondTo = 192.168.1.0-255.
With Responder configured, we can now look to Snarf. What Snarf will do is bind to port TCP/445 listening for incoming SMB connections. Once a SMB connection is established, the credentials will be relayed and cycled to each of our targets. These relayed sessions will be kept alive until we choose to use them (no service creation). However, it is important to note that a (Potential Detection) successful Logon Type 3 will be logged on each of the targets. Using snarf, we select which SMB session to use and go from there.
Executing Snarf
- Start up Snarf with bind address
- nodejs snarf.js 192.168.1.10
- Forward SMB traffic to Snarf
- iptables -t nat -A SNARF -p tcp –dport 445 -j DNAT –to 192.168.1.10:445
- Access the Snarf control server with the browser
- Add the targets to Targets (Cycle)
- On the control tab, set target mode to cycle

Before any SMB connections are forwarded to Snarf, netstat the port bindings and note that Snarf is listening on TCP/445 at the bind address. When a SMB relay session is chosen, Snarf will setup a separate listener on 127.0.0.1:445, this will be used for nastiness.
Executing Responder
- Start up Responder on our target interface
- responder -I eth0
If everything was configured correctly Responder should be poisoning LLMNR, NBT-NS, and DNS/MDNS while SMB should be labelled as off.
Now, let’s say that Frank tries to browse a share and mistypes, or has a persistent mapped drive to a server on an inaccessible network, either way Frank cannot find the target and rolls through the name resolution cycle – hosts file, dns, llmnr, and netbios-ns. Since llmnr and netbios-ns are broadcast across the network, Responder sees this come across the wire and responds with 192.168.1.10, our attacker’s IP; Frank’s PC is poisoned. Additionally, Frank’s PC attempts to connect to the fileshare on 192.168.1.10, this is forwarded to Snarf. Snarf gets the NTLM challenge from our targets and relays that back to Frank’s PC. With the attacker in the middle, Frank’s PC and our targets go through the authentication process, and hopefully, it’s successful. I know I’ve seriously skimmed this concept so I’ve linked Ed’s post below.
https://pen-testing.sans.org/blog/2013/04/25/smb-relay-demystified-and-ntlmv2-pwnage-with-python
Snarf now has a relayed session on each of our targets.

The three active sessions are kept alive by Snarf each using Frank’s credentials while originating from Frank’s PC. Connection 192.168.1.53 -> 192.168.1.50 is the current session which is bound to 127.0.0.1:445 as mentioned above. On the same page are the available actions: NTLMv2 challenge/response hashes are available for offline cracking, kill terminates the session, choose makes the session current (mapped to 127.0.0.1:445), and block blacklists the relay source. Note, in some cases I have had to expire a session in order to choose it.

Previously mentioned, Frank is a local administrator on 192.168.1.53 and 192.168.1.51. Frank also has access to a fileshare on 192.168.1.52 but does not have local administrator privileges.
Session 192.168.1.53 -> 192.168.1.52 is made active by selecting choose. Enumeration begins by using smbclient, first step is to list the available shares with smbclient -L which reveals a share named Sensitive Directory … you cannot make this stuff up :P. The target (127.0.0.1) was discussed but note the usernames that are used: whatever and notauser; Snarf automatically forwards Frank’s credentials when connecting to 127.0.0.1:445.

This illustrates a situation where we enumerate a system using SMB relay without dropping files to disk and creating a service. Also, targeting 192.168.1.52 with a relay shell tool like Smbrelayx or Metasploit’s Psexec module would fail since we do not have administrator privileges.

Let’s target a system that Frank has administrator privileges on, using Snarf the current session is moved from 192.168.1.53 -> 192.168.1.52 to 192.168.1.53 -> 192.168.1.51, the session we migrated from is kept alive, nothing is lost. Using the same technique as above, the ability to access the admin$ or c$ is a pretty good indication of administrator privileges.

At this point the access and privileges are there which brings us back to our initial issue, what to do while being quiet? Unfortunately I don’t have a simple answer and it might rely on the target system, however some options do come to mind.
Remote Hashdump
One option is to perform a service-less hashdump to grab a shell with something like wmiexec. Microsoft restricted the ability to pass the hash using local accounts; however, that functionality is still available for the administrator (RID 500) account. Using the net rpc command, the status of the administrator account can be queried.
Note, to use the net commands through Snarf I had to disabled client signing in smb.conf (client signing=disabled and client ipc signing = disabled).
https://www.samba.org/samba/docs/man/manpages-3/smb.conf.5.html

In this case the administrator account is enabled. If it were disabled, technically we could re-enable … but noise. Using net rpc registry save, registry keys can be saved to a file, this includes SAM and SYSTEM, potentially giving us access to the system hashes.
(Potential Detection) Note, in order to perform this registry dump, the net rpc registry command will start the remote registry service, again when it comes to detection pick your poison. Interestingly enough, the remote registry service on my target was disabled, I guess it doesn’t stop the service from actually starting? If anyone can comment on this I would really like to know.

Using pwdump, we acquire the system hashes using the SAM and SYSTEM file exported from the registry. With these hashes we are able to use Impacket’s wmiexec to establish a shell session without creating or starting a service. From this wmi shell we can spawn an in-memory meterpreter, beacon, or empire session.

So there is a shell without creating a service. Yes we did start remote registry service but I would consider that less noisy than creating a new service and deleting shortly after.
Given the privileges and access there are a variety of available methods to establish a shell session on the target. AT could be an option, schtasks is another, all of which have various footprints, but I think the key take away from this exercise is the choice of when to establish a shell. Personally, I don’t want to pop a shell via a new service unless I choose to do so, that’s my main reason to use Snarf instead of the other relay tools. Either approach is perfectly cool with me!
So if you haven’t rage quit yet, and don’t appreciate all the work done getting around not creating a service, well here you are :).

In summary, SMB relay is a great way to get that initial foothold on a target network. However, some of the tools I find can be a bit quick for my liking, I prefer to slow it down enumerate my target before spawning a shell. This is why I like Snarf, a slow approach while not sacrificing the poisoned SMB sessions.

Can you elaborate more on the net rpc registry save. On my kali machine I can see only a net rpc registry export command, that is not working as expected…
LikeLike
Weird. Are you still having issues? I’m running Parrot instead of Kali so keep that in mind. What is the output if you run – apt list samba-common-bin
LikeLike
Is there a tool or way for Snarf/Responder and etc to work with proxy chains so I could run Nmap or Crackmapexec through them as a proxy without using Meterpreter?
LikeLike
Hey Jon, do you mean something like this – https://www.youtube.com/watch?v=05W5tUG7z2M ? To be honest, I’m not sure, I would expect it to work but I’ll have to test it in the lab to be certain. I’ve used ZackAttack in the past, good tool but IIRC I ran into quite a few bug issues.
LikeLike